There are no products to list in this category.
Five Challenging Yoga Practices for a Challenging Breakup
Posted By on Thursday 22nd May 2025
If you’ve ever been heartbroken from a challenging breakup, then you know how hard it is to go about your life without that person. When this happened to me, I remember how debilitating it was. I spent weeks crying myself to sleep. I couldn’t even muster the energy to do daily tasks. I would spontaneously break down into tears. I was a mess; inside and out.
I believe in the therapeutic effects of yoga. Desperate for some respite, I tried googling what kind of yoga other people do for a heartbreak. I found some gentle, restoring poses. I tried them, but found that I didn’t feel any better about myself or my situation. Thinking back, I realize that I couldn’t bear to hold myself in the gentle and comforting positions because I did not feel comfortable on the inside. I couldn’t comfort myself on the outside using the comforting poses because I had a whirlwind of emotions and painful thoughts storming on the inside.
What I really needed was a way to empower myself. I needed to stop feeling sorry for myself. I needed to remind myself that I am good enough! I needed to whip myself back into (emotional, physical, mental) shape. So for those of you needing that for yourself, whether you are healing from a heartbreak or just learning to love yourself, here are five challenging yoga practices I can offer for you.
And THEN maybe afterwards you will feel more inclined to check out some restorative positions to rest your heart and soul.
You can choose to only focus on one of the following poses, adding it into your regular yoga practice. Focusing on one specific practice might help you to hone in on that specific one, allowing yourself to learn something new each time you do it, and get better and better at it. You could also choose to do a few of them, since they work on different parts of your body. Or, you can also choose to do all of them if you’re up for the challenge. Try out what works for you. As always, feel free to ask for assistance from your favorite yoga teacher if you need guidance in any of these positions to not hurt yourself!
Here we go:
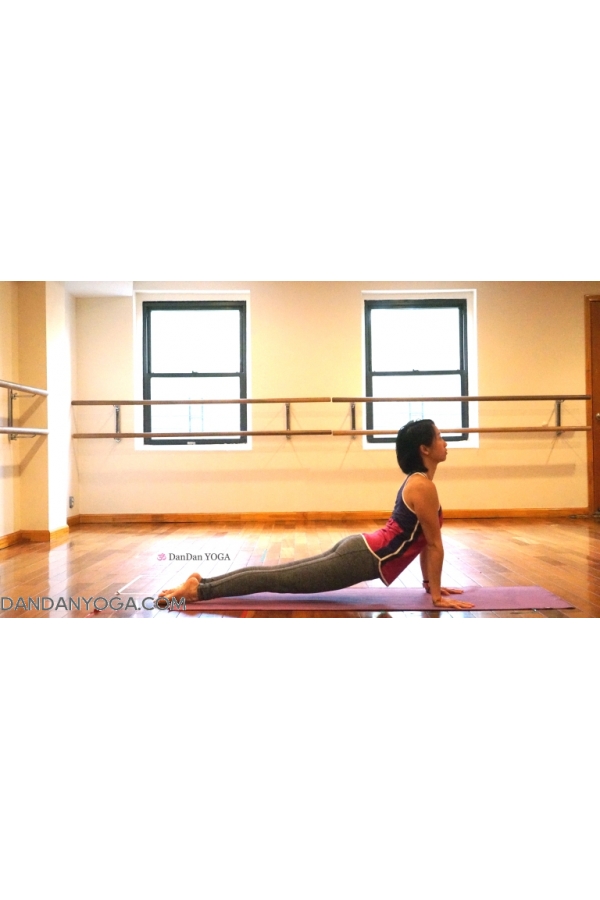
1) DOWNWARD DOG – CHATARANGA – UPWARD DOG Trio
Downward Facing Dog and Upward Facing Dog are opposites, so it’s great to pair them together to lengthen your spine, and open your shoulders and chest. And Chataranga, well, why not invigorate yourself with this incredible challenging, core strengthening, arm strengthening, power generating, sweat (toxin) releasing pose? Practice this trio consistently, and you’ll be strengthening and/or stretching practically the whole body. If doing all three together is challenging for you, then try the poses solo and work yourself up to the sequence of the three together.
Start in Adho Muka Svanansana (Downward Facing Dog). Points to remember:
- Keep your feet hip’s distance apart and hands shoulder’s width apart to find a strong base of support for your body.
- Lengthen your hips up and back, think of the tailbone growing longer and away from your spine.
- Draw your chest toward your legs, as if you are bringing two covers of a book together — keeping your back straight. Think of forming a 90° angle with your legs and your spine.
- Actively lengthen your arms like they are extensions of your spine. Draw your armpits to face away from your body (this is a small rotational movement of your shoulder) as you continue to bring your weight towards your feet, not your hands.
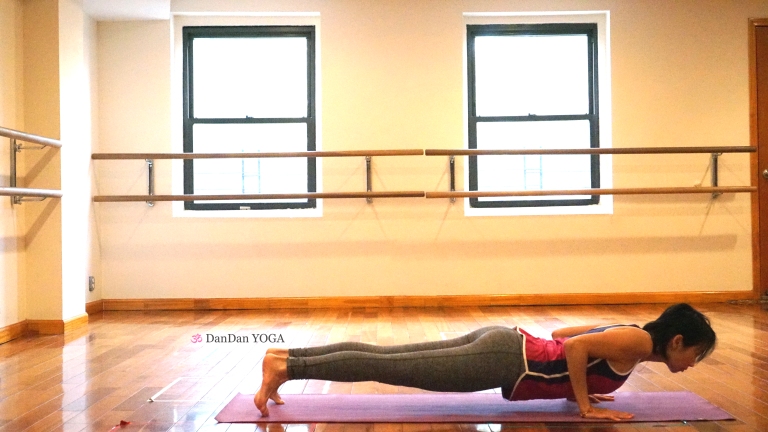
Then transition into Chataranga Dandasana (Four-Limbed Staff Pose). Points to remember:
- When transitioning from Downward Facing Dog to Chataranga, bring your shoulders forward of your hands (coming to your tippy toes to draw the body forward) then bend the elbow so that it is right over your wrists — keeping the elbows close to your body. Don’t let your elbows bow out to the side to avoid elbow injuries!
- Find the “staff” in the pose per the name by keeping your entire body straight (this will not be easy!) to strengthen your core — no sagging or sticking out at the hips!
- For an EXTRA challenge, hold this for 30 seconds before moving to Upward Facing Dog.
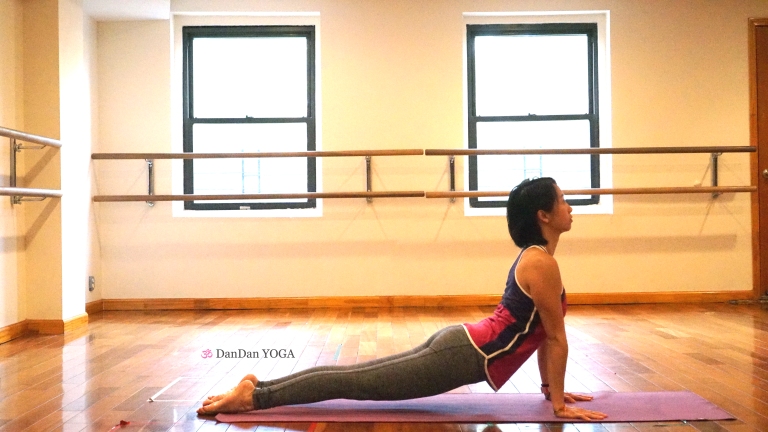
Transition to Urdhva Mukha Svanasana (Upward Facing Dog Pose). Points to remember:
- When transitioning from Chataranga to Urdhva Mukha Svanasana, you can first let your entire body come to the ground first, or you can push the ground away with your arms to go directly into Upward Facing Dog without coming to the ground (this is more difficult).
- Keep your arms straight and chest broad, roll the shoulder towards your back.
- Draw your feet hips distance apart to give space for your tailbone to lengthen.
- Your thighs are active here; imagine the back of your thighs are pushing up toward the ceiling to straighten the knee joint.
- This is a deep backbend, but as in all backbends, don’t just think about bending your back; but think about lengthening your spine, particularly the front of your body, longer.
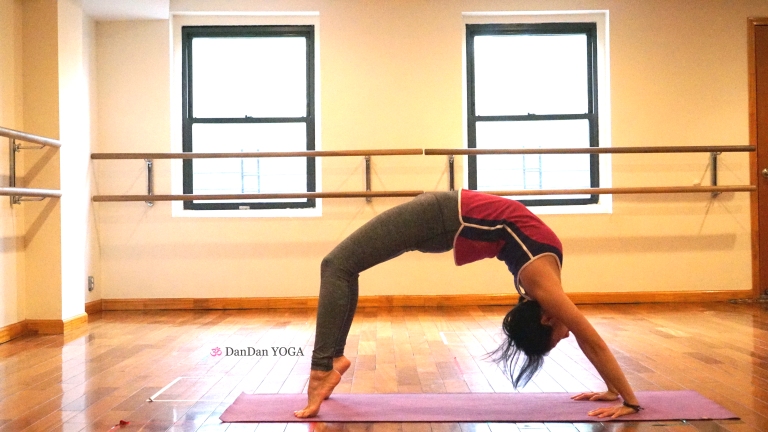
2) Urdhva Danurasana (Upward Facing Bow Pose)
This is another deep backbend that you can practice to lengthen your spine, open up your heart, and see a different perspective of the world (literally!). Again, it may be a challenge to get here. Coincidentally, practicing the trio of Downward Facing Dog – Chataranga – Upward Facing Dog is going to help develop all the muscles you need to tackle this position. So if this one is a problem, go back and practice the trio first. When you’re ready, here are some tips:
- Start this position from lying on the ground with your knees bent. Your heels are almost touching your fingers if you have your arms by your side. Then place your palms on the mat, fingers pointing toward your shoulder. While you’re here, take a second to check your elbows and knees, bring them perpendicular to the ground (no bowing out). When you are ready, one vertebrae at a time, draw your spine off the ground. When you’ve drawn your spine off the mat as much as you can, push with your arms (palms still flat, elbows still perpendicular) to lift your shoulders off the mat. Continue pushing through your arms until your arms are straight.
- Remember to lengthen your spine, especially the front of your body, not just bending the back.
- Check in with your palms and soles of the feet. Distribute the weight evening through the entire palm and sole, out through the fingertips and toes.
- When you’re ready to come out of the pose, slowly and with control, bend your elbows. Draw your head parallel to the ground and gently allow your head and neck to come down softly on the mat, and then let the rest of your spine follow softly on to the mat, one vertebrae at a time.
- I suggest asking an experienced yoga teacher to assist you to learn this pose if you’ve never done it before. It may be very helpful to have someone present to talk you though it.
- For an extra challenge, you can try raising your heels off the ground so that you are placing the weight on to the balls of your feet and your toes. Try holding for 30 seconds or longer!
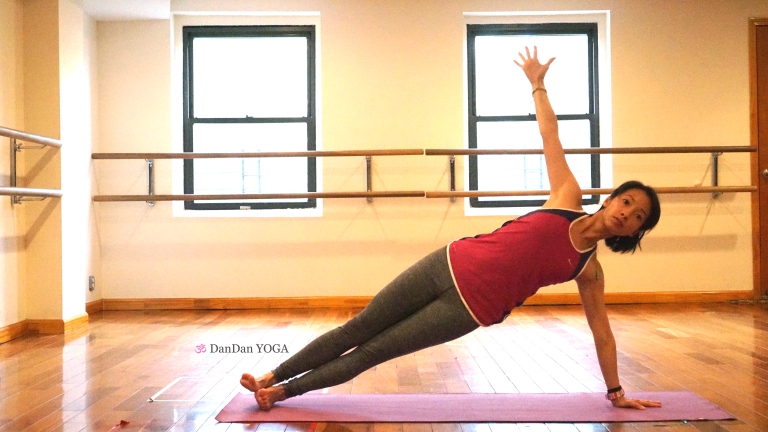
- 3) VASISTHASANA (SIDE PLANK)
This is the other plank that is not practiced as often. Why? I have no clue, because it is amazing for your obliques. It is also strengthening for your arms and very exhilarating to practice holding this pose. Your abs will thank you. Here is how:
- Start in Downward Facing Dog. From there, draw the outer edge of your right foot on to the midline of the mat — so now your right toes are facing the left and the foot is parallel to the short edge of your mat. Your foot should be flexed toward you (drawing the toes in toward your body) so that you can rest your weight on the edge of your foot. Now place the other foot right on top of your right foot in the same flexed position. Bring your palm to the same midline of the mat, with the fingers facing the top of the mat (away from your feet). To protect your shoulder, place the palm right under your shoulder, or in front of your shoulder; not behind — in other words, your arm and your trunk should make a 90° angle or greater; not less than 90°.
- To balance your body, always practice both sides.
- Lengthen your trunk and spine — imagine you are lengthening from the ankle all the way through the crown of your head. Find the “Plank” here by drawing your body long and straight.
- If the full pose is too much for you right now, you can start with an easier variation by bending the right knee and placing the right knee on the mat, with the right foot resting on the mat behind you. Lengthen the left leg (the one on top), keeping it straight and in line with the trunk. Even with the lower leg bent, continue to maintain the “Plank” in your spine and trunk.
- For an extra challenge, try lifting your top leg off the bottom leg. Lengthen out through the heel of the top foot and continue to draw your spine long away from the foot.
4) Adho Mukha Vrksasana (Downward Facing Tree Pose or Handstand)
Finally, we come to Adho Mykha Vrksasana. I promise that if you keep practicing this pose, you will feel amazing in so many different ways — your body will feel strong, your emotions will settle down, your breathe will find a new life. I find this pose to be so great. I really suggest practicing those poses first to get yourself ready for handstand if you’ve never done it before. Here are some extra tips/reminders:
- The greatest thing in your way of getting into this pose is your mind. So practice letting go of the fear of falling. While practicing another pose (Forearm Stand — a different inversion) last week, I tried to do something fancy, and ended up falling over sideways — ouch. I got some pretty gnarly bruises on my legs from it, but then I got up and I was fine. Sometimes, we slip and fall in life. But (cliche as it is) we must learn to get up again from the fall and not let that fear of falling again govern us forever. That’s why this pose was so amazing for me. It is a life lesson wrapped up in a yoga pose.
- If you have hyper-extended elbows like me (a.k.a. double-jointed), practice having a tiny little bend in the elbow in this pose (and all poses that require straight arms), so that your elbows are not “locked”. This will be harder because then it requires you to actually use your muscles instead of just letting the weight sink into your elbow joint. This will save your elbow in the long run and help you develop the strength in your arm muscles.
- This pose is also a great workout for the core as well. Try holding this pose for 30 seconds or more. You will find that it ain’t no easy task!
5) Meditation Practice
While this is not a pose, per se, this is definitely one of the most challenging practices you can take on. I suggest committing to meditating for a short amount of time (start with something attainable, like 5 minutes!) every day, and I guarantee you will start to feel better about yourself in no time (ok, it will take some time to really get the hang of it). Here are a few additional tips:
- If you are coming out of a challenging breakup, this is probably the hardest practice to endure. While practicing meditation, you will be faced with all those stormy thoughts and emotions that you may have been trying to hide from. When I practiced meditation through those heavy, dark days of heartbreak, each time I sat down, my thoughts seemed to punch me in the face and beat me up from the inside. Acknowledge that you are having the thoughts — the point is to NOT stifle them. Then, allow yourself to make the choice to let the thoughts go. If it seems like there are a hundred thoughts going on at once, just work on one thought at a time. Imagine one thought at a time floating out with your exhale and through the window.
- Whatever happens, practice not judging yourself. If it’s very difficult for you to not be hard on yourself, imagine that you are comforting your heartbroken best friend instead of yourself. Wouldn’t you be kind and gentle with him or her? Try to practice being just as gentle and kind to yourself. We often forget that we deserve that same love that we give to others.
- Remember that it is a meditation practice. The important part of meditation is the actual practice of it, not having the perfect meditation session. It is in practicing it that we learn to let go of those things we might be holding on to in my hearts. Don’t give up, you got this!
Final tips/ suggestions/ comments:
- Go easy on yourself even as you are tackling challenging poses/ practices.
- If you need help with anything I wrote about here, always ask for assistance from an experienced yoga instructor to avoid injury to yourself. (You don’t want to break anything else!)
- I believe that giving yourself something to work toward, whether it’s a challenging yoga practice, or something else completely non-yoga related that you want to do instead, it will help you to find the strength to move on from the heartbreak.
- Give yourself as much time as you need. If you let yourself, you will come out from this stronger than your were before.
- Namaste. ♥